Currently reading:
problems crimping with yellow crimps, 6mm.

Discuss problems crimping with yellow crimps, 6mm. in the UK Electrical Forum area at ElectriciansForums.net

HappyHippyDad

-
Esteemed
Arms
Supporter
Reaction score
5,636
This is only the second time I have had to crimp 6mm cable. I remember the first time a couple of years ago I had problems. Again this time the connection just pulled apart in my hands.

After looking through the forum I can see that others have had the same problem specifically with yellow crimps. 1mm and 2.5mm seem to crimp perfectly well (again seen in other threads), but with 6mm there is a problem.

The reason for this thread is because other threads point to the crimp or the crimping tool being the problem. I have a CK crimping tool which has good reviews and crimps 1mm and 2.5mm very well (I have tested these in a vice), so I believed the crimp to be the problem. I was about to buy some SWA crimps as other threads point to these being good quality. However, my red and blue crimps were bought from the same manufacturer as the yellow so it didn't really make sense that it was the crimp at fault.

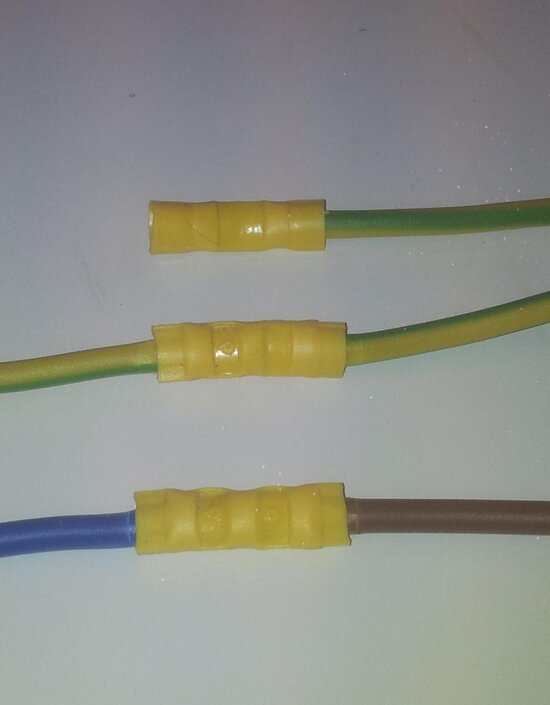
I've just been in the shed crimping 6mm in a number of different ways and think I have found the problem. With red and blue crimps you have the crimp flush with the crimping tool when you crimp. I assumed it would be the same with yellow, however the crimping tool is wider for the yellow crimps meaning that when you crimp you are crimping the entire half of the crimp (perhaps even slightly over), meaning that you are crimping down on the piece of metal that sticks out in the middle of the crimp and I think this must be stopping the crimping tool from crimping properly.

The top crimp (see picture) was crimped with the yellow crimp (outer part) flush with the crimping tool and just pulled out easily. With the other two I slightly pushed the crimp into the crimping tool so that the central piece of metal would not be disturbed (you can see that the bottom 2 crimps have a bit in the middle still raised whereas the top one doesn't). I could not pull either of these out when placed in a vice.

Correct crimping is so important I thought I'd mention my little test. I tested the 2 ways each with 5 crimps and it was the same with all of them.
20160327_211525.jpg
 
Last edited:
So rather than crimping to extend a circuit (I.e. 2.5 T&E) how would you recommend doing this - non-insulated / insulated crimps / solder (heat strink or not), connectors, wagon etc etc)?

These days I'd always use wagos, but when I was an apprentice it was always the good old 30A joint box.

You shouldn't use crimps with solid core cable unless the connector and the tool used are specifically intended for use with solid cores.
 
So rather than crimping to extend a circuit (I.e. 2.5 T&E) how would you recommend doing this - non-insulated / insulated crimps / solder (heat strink or not), connectors, wagon etc etc)?

We used to use solder regularly but in recent years we've had more and more written contract specs that specifically forbid it so we don't use it very often nowadays. Not sure why it's gone out of fashion....
 
We used to use solder regularly but in recent years we've had more and more written contract specs that specifically forbid it so we don't use it very often nowadays. Not sure why it's gone out of fashion....

Perhaps because there are too many people who can't do it correctly, use the wrong solder, don't properly insulate afterwards etc. If you use a certified terminal according to the manufacturers' instructions, the result should be fairly predictable. Soldering depends directly on the skill of the wireman, which I have to say is sometimes noticeably lacking these days. Working on a lot of electronic stuff, rarely a day goes by where I don't solder a dozen or two connections; on extreme days I'll handle everything from 0.5mm pitch 64-pin connectors to 0.2 sq. ins lugs or upwards of 1000 connections. But when I want to extend a bunch of circuits I'll use Wagos or sealed splices, because on the whole they make sound joints and are quicker, soldering only where there is a definite advantage to do so.
 
We used to use solder regularly but in recent years we've had more and more written contract specs that specifically forbid it so we don't use it very often nowadays. Not sure why it's gone out of fashion....

A general lack of skills is one reason I think.
The drive towards getting rid of lead from products can't have helped very much either, and whatever anyone says lead-free soft solder is just not the same.
 
not much left

Thankfully 60/40 is likely to be available for decades yet as there are still applications where it is necessary and isn't prohibited. Plus it has to be used for repair of exisiting equipment as you can't rework with lead-free where 60/40 was used during manufacture. I use about equal amounts of both as I handle a lot of older stuff.
 
Just out of interest how do you go about soldering a joint? I've never had to do it, Nor have I seen anyone do it. I've soldered the odd pipe when I've been doing my own plumbing but The last time I soldered anything electrical was in secondary school, And I spent most of that time making little solder blobs to throw at everyone else....
 
Just out of interest how do you go about soldering a joint? I've never had to do it, Nor have I seen anyone do it.

This intrigues me, I'm not saying it's a bad thing, just that it shows how little is soldered these days compared to times past when it was almost an essential part of electrical work. The main bullet points are:

* Ensure everything is squeaky clean. Remove any tarnish from surfaces.
* If appropriate, tin the components by applying solder and iron together until solder runs over surface
* Make a mechanically secure joint; twist wires together / wrap around tags or through holes / insert snugly into lug etc
* Heat the whole joint as quickly as possible while applying solder until it runs freely and penetrates joint
* Remove heat as soon as joint is completely filled / saturated
* Keep perfectly still until cool.

Some types of joint and materials are easy and predictable to work with, others are more erratic and need extra care in preparation to ensure a good result.

Common faults are:
* Inadequate preparation of dirty or oxidised surfaces (these would often make a faulty crimp too)
* Not getting the joint hot enough quickly enough resulting in heat damage while waiting for solder to flow
* Plastering the joints with solder instead of allowing capillary action to wick it inside

A lot of people are surprised when they see me connect wires to terminals e.g. on a multipole connector, that the solder joint itself is often made in a second or even 1/2 second - it can be a very quick easy process. Last week I had to extend some miniature 30-core cables securely without the joints being bigger than the normal cable sheath. Soldering and heatshrinking was by far the best choice. It's a skill worth practising.
thats the other thing, i was watching some videos on youtube (bigclive) and some of the cheap ones out of china seem quite good even though you will have to calibrate them to the right temp yourself
 
This intrigues me, I'm not saying it's a bad thing, just that it shows how little is soldered these days compared to times past when it was almost an essential part of electrical work. The main bullet points are:

* Ensure everything is squeaky clean. Remove any tarnish from surfaces.
* If appropriate, tin the components by applying solder and iron together until solder runs over surface
* Make a mechanically secure joint; twist wires together / wrap around tags or through holes / insert snugly into lug etc
* Heat the whole joint as quickly as possible while applying solder until it runs freely and penetrates joint
* Remove heat as soon as joint is completely filled / saturated
* Keep perfectly still until cool.

Some types of joint and materials are easy and predictable to work with, others are more erratic and need extra care in preparation to ensure a good result.

Common faults are:
* Inadequate preparation of dirty or oxidised surfaces (these would often make a faulty crimp too)
* Not getting the joint hot enough quickly enough resulting in heat damage while waiting for solder to flow
* Plastering the joints with solder instead of allowing capillary action to wick it inside

A lot of people are surprised when they see me connect wires to terminals e.g. on a multipole connector, that the solder joint itself is often made in a second or even 1/2 second - it can be a very quick easy process. Last week I had to extend some miniature 30-core cables securely without the joints being bigger than the normal cable sheath. Soldering and heatshrinking was by far the best choice. It's a skill worth practising.

Thanks Lucien, Very helpful, It certainly wasn't showed to us at college, and possibly even discouraged, And I worked largely on new build so the need for soldering and jointing wasn't always there for me. Are we talking only soldering smaller sized cables or can Larger cables be soldered? Is it just a standard solder and iron that is used or is there a specific solder for electrical connections?
 
Almost any copper cables / connections can be soldered giver the right equipment and solder.

'Electrical solder' is normally either lead-free (mostly tin) or 60/40 tin-lead, cored with non-corrosive flux. These are both suitable for most work between say 0.1mm² and 25mm² but they require different temperatures and handling, and must not be mixed. If you are dealing with very large / heavy parts where mechanical strength is critical or there is high temperature or vibration in service, then alternatives may be needed to suit the conditions, with separate flux e.g. zinc chloride or rosin. For miniature work on PCBs, solder paste is often used instead of wire.

The traditional basic 25W iron that many people buy for occasional use is only suitable for a limited range of work. It will not heat a splice in 2.5mm² hot enough to use LF solder, might just work with 60/40, although it will connect 7/0.2 to PCBs quite happily all day long. Any serious work needs an adjustable thermostatic iron, 50W is a popular choice for bench work, equipped with a suitable range of tips, which will handle the tiniest PCB repairs (0.1mm tip) up to about 4mm² (6mm chisel tip). Above that you need more power, I have 100 and 250W irons in the drawer, the 250W will do high temperature tinman's solder joints in medium size motor windings etc. also small copper and tinplate fabrication. Above that I go to blowlamp or metal pot. It is a long time since I poured a solder joint on a heavy cable, thanks to crimps!
 
Last edited:

Reply to problems crimping with yellow crimps, 6mm. in the UK Electrical Forum area at ElectriciansForums.net

OFFICIAL SPONSORS

Electrical Goods - Electrical Tools - Brand Names Electrician Courses Green Electrical Goods PCB Way Electrical Goods - Electrical Tools - Brand Names Pushfit Wire Connectors Electric Underfloor Heating Electrician Courses
These Official Forum Sponsors May Provide Discounts to Regular Forum Members - If you would like to sponsor us then CLICK HERE and post a thread with who you are, and we'll send you some stats etc
This website was designed, optimised and is hosted by untold.media Operating under the name Untold Media since 2001.
Back
Top