Search for tools and product advice,

Discuss Repairing imperial mineral cable in the UK Electrical Forum area at ElectriciansForums.net

D Skelton

-
Mentor
Esteemed
Arms
Reaction score
3,570
Last week I did a job for forum member joramtor. Link to the original post here: http://www.electriciansforums.co.uk...s-your-area/87967-repair-micc-pyro-cable.html

He had an underground mineral cable that had been severed by the groundworkers so off we went to sort it out for him. The length of cable that was broken was about 50m long and ran between two lamp posts in his driveway. I thought I might put up some photos of the work along with an explanation so that those less experienced with mineral might learn something. Feel free to add to it if you want (I'm sure much flaw picking and critisism will ensue also :D).

First off the customer snipped a piece off and posted it to me so that I could determine whether it was imperial or metric and also so that I could size the pots and glands needed if it was imperial (the job was over an hour away so couldn't just pop round). Upon receiving it it was immediately apparent that it was imperial so I used my calipers to size the pots and glands needed. The pots needed were 2L2.5, the glands needed were 4L1.5 and the seals needed were 4L1. The cable in question was 4 core with the conductors being equivalent to 0.75mm-1mm.

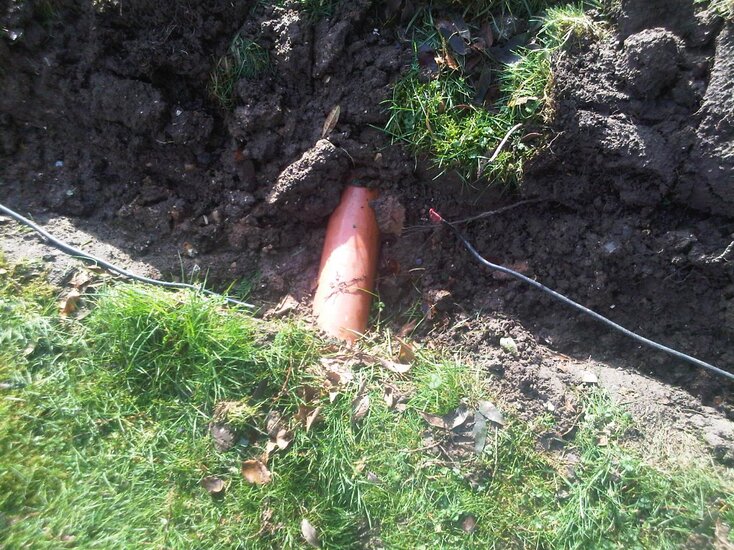
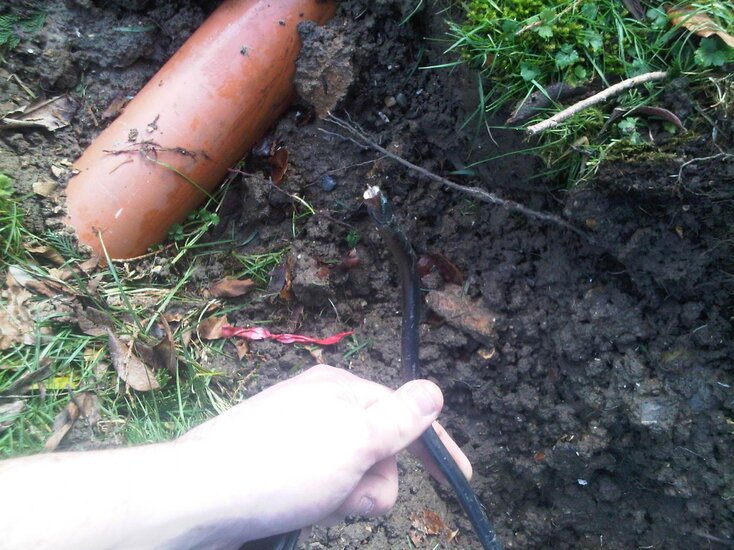
When I arrived at the job this is what I found, it had been lying here like this, exposed, for about four months:
1.jpg2.jpg


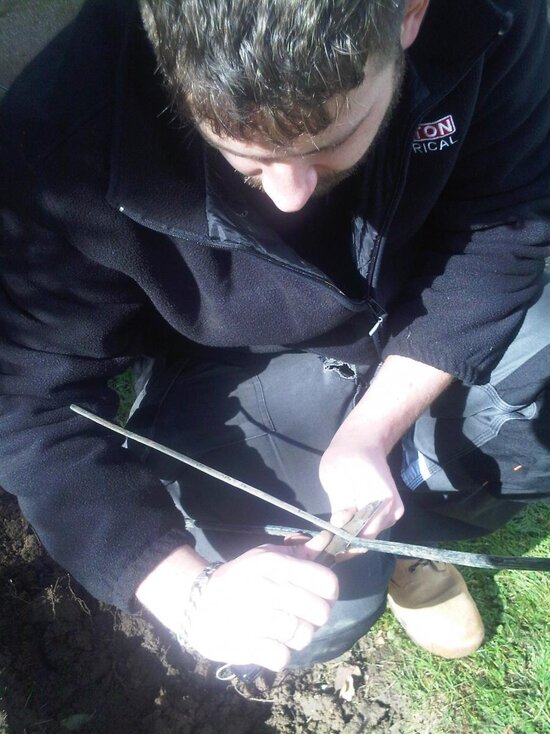
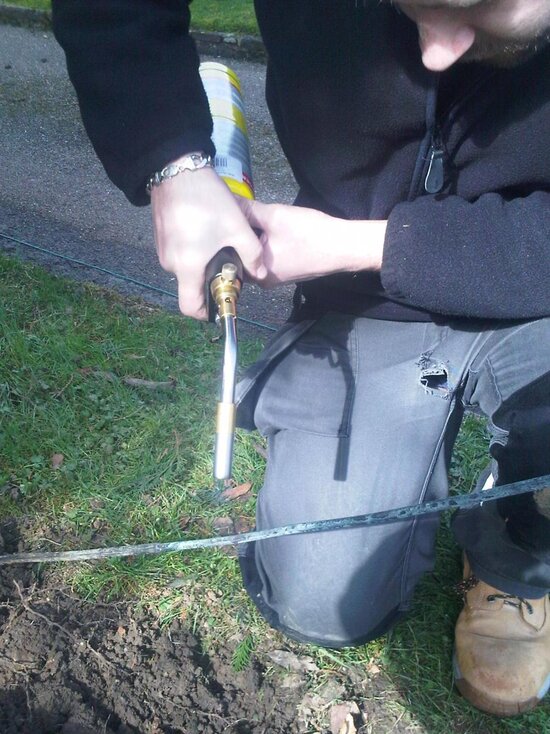
First thing's first, isolate and lock off (circuit was already off at the breaker). Then to start... I chopped the ends away with an angle grinder for a neat and square application of the stripper (a square end always makes starting off the stripper easier) and stripped back a good three quaters of a meter of the sheath with a ring and pull. Next thing to do is to get the blowtorch out and give the cable a good blasting. Short, slow even strokes towards the cut end of the cable from about 650mm back to get rid of any moisture ingress. Remember the magnesium oxide that makes up the insulating mineral compound is hygroscopic, it wicks up moisture like nobody's business! So we have to get that out.
3.jpg4.jpg


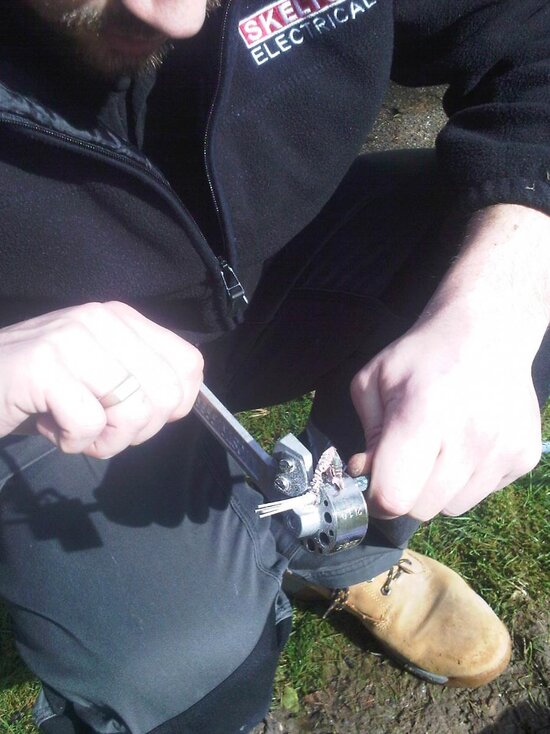
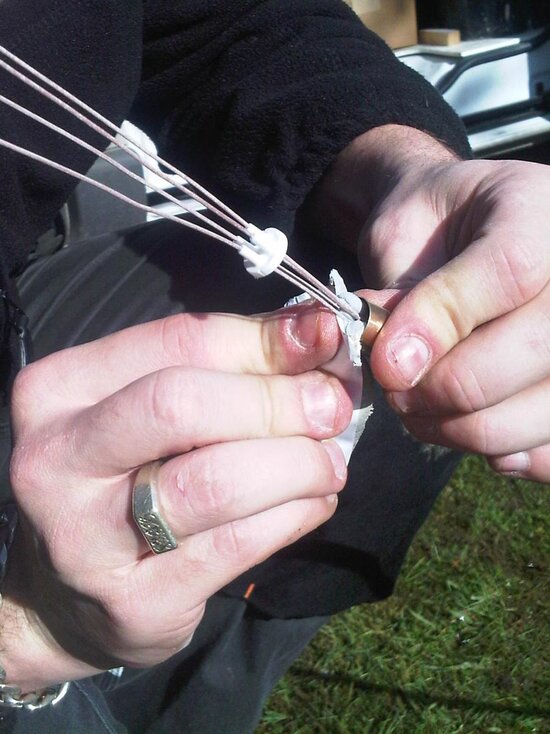
After ten or so minutes of doing this I let the cable cool and after it was, I slid on the glands and then started stripping it back with the joistripper. This was tougher than usual as the cable was very slightly too fat to fit in the 2L2.5 hole and a bit loose in the 4L1.5 hole. I went through two blades with this bit! In hindsight I should really have used a heavy duty stripper but hey ho. When the cables were stripped back the pots were screwed on and potting compound was applied from one side only to eliminate air pockets within the pot. Notice the caps are half slid down, this helps to keep the conductors in place through the potting compound filling process. The caps were then put in place and crimped using a mineral crimping tool.
5.jpg6.jpg


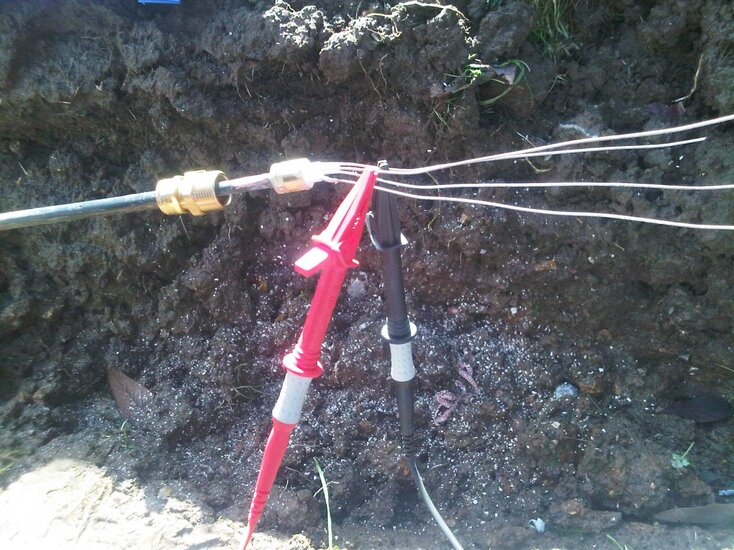
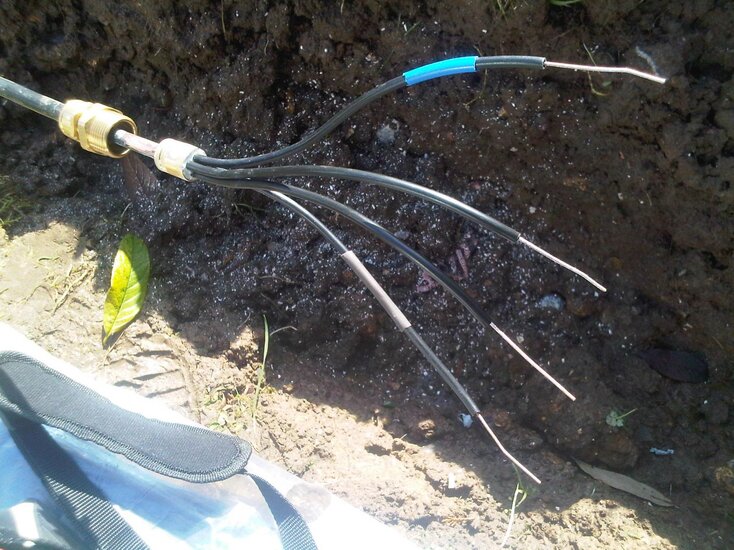
When this was done it was time to IR the conductors and copper sheath. The lowest result was roughly 20Mohms live-live. Not perfect but okay. After this I belled out the ends between the break and each lamp post with my long lead to determine which core was which and also to check earth continuity on the sheath which was being used as the cpc. Once this was done the insulation was applied and the cables identified. Two cores were not used and were disconnected at the lamp posts. At the supply end I ensured that these were earthed as they previously weren't.
7.jpg8.jpg


Once this was done I terminated the gland at one of two Pratley underground junction boxes making sure to clean the copper on the exposed mineral sheath to ensure zero resistance between this and the olive within the compression gland. I then prepared a short length of 4 core 1mm SWA to bridge the gap and terminated this into the other side of the Pratley.
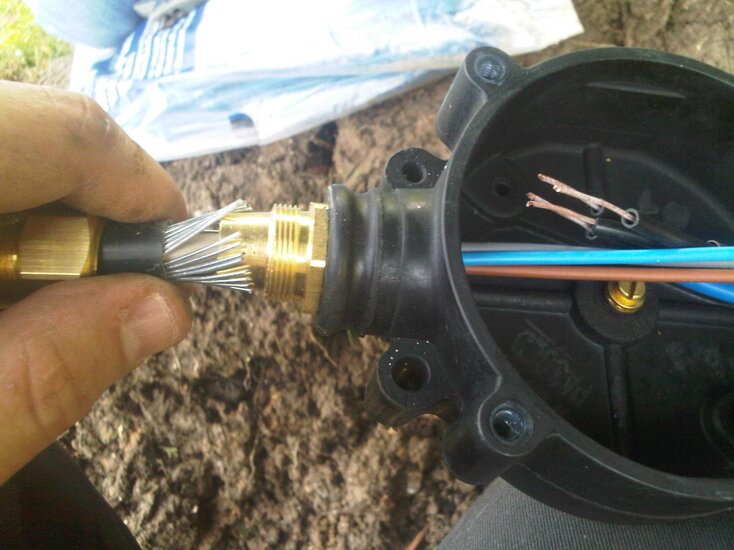
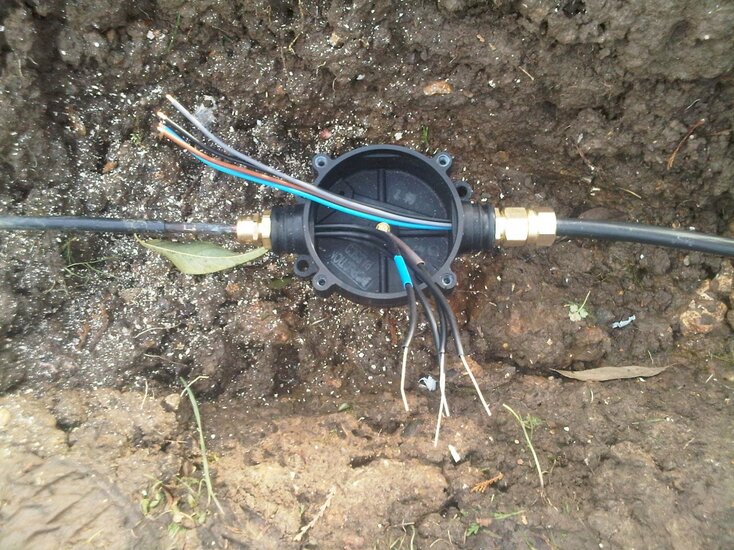
9.jpg10.jpg


This process was then repeated on the second Prately on the other end of mineral cable so that the short length of SWA was the bridge in the gap of the break. Once this was done it was time to seal the gland terminations. I tightly wrapped some insulation tape at the join between the glands and the cable to ease the transition and then wrapped tightly and carefully with a couple of layers of self amalgamating tape. This will seal the joins and prevent corrosion of any previously exposed metal.
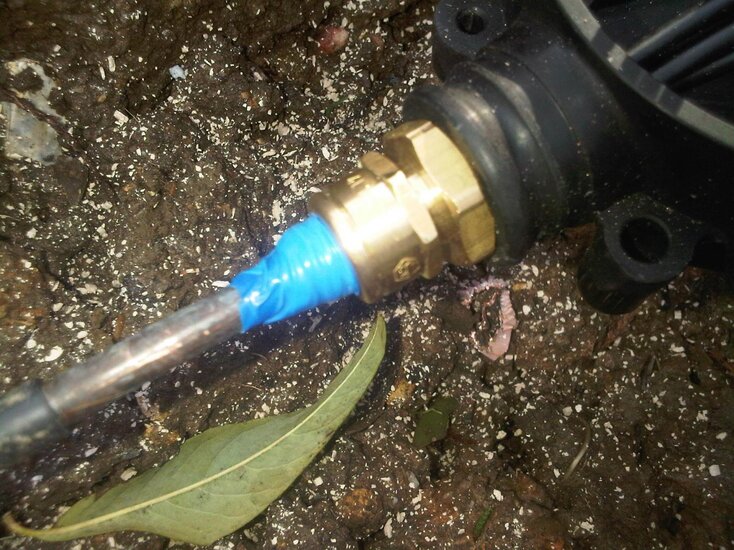
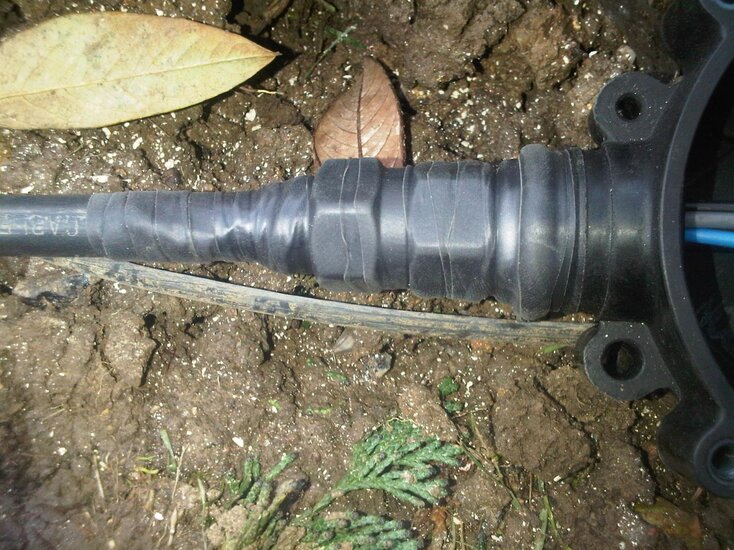
11.jpg12.jpg


Once sealed up the cables were joined with wagos and the circuit tested, dead tests then live. Total lowest IR had now reduced to 15Mohms (a product of the increase in length [2x25m = 50m]), again, not perfect but okay. Pratleys have a built in method of preserving cpc continuity so no need for fly leads. All tested out ok so MCB on and a functional test of the circuit carried out. All ok. MCB off, JBs sealed up with the lids and put in place, circuit energised and away we go!
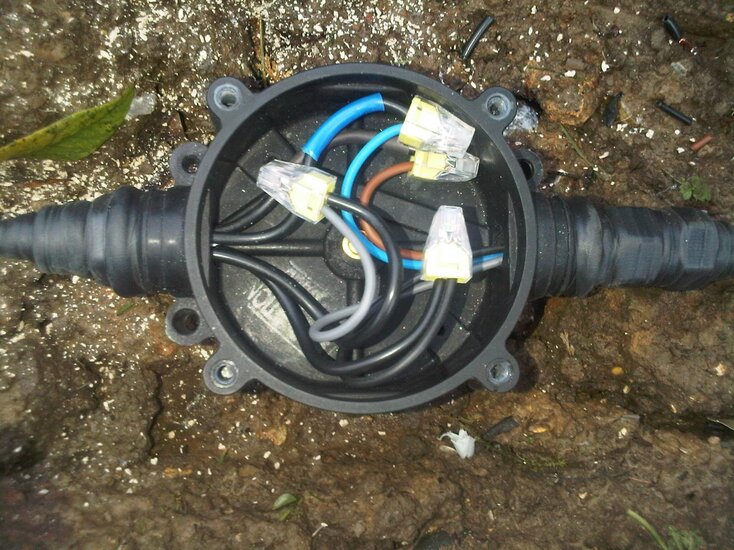
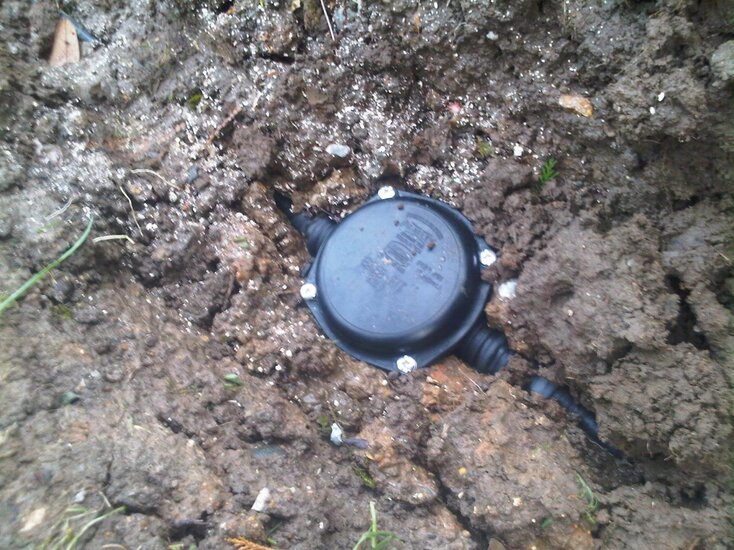
13.jpg14.jpg


The customer was told by more than one person that it couldn't be done, and here it is! Never say never! :)
 
Looks good... We have been doing MICC at college recently, out of interest what tool do you use for screwing the pots on? :smile:

With normal light duty stuff you can usually use your fingers but because the pot was very tight on this imperial stuff I had to use a potting tool. It's essentially a cylider that clamps onto the pot and makes it easier to turn.
 
potting wrench.jpg
I have been using this one at college, i am not sure if they make bigger sizes though.


With normal light duty stuff you can usually use your fingers but because the pot was very tight on this imperial stuff I had to use a potting tool. It's essentially a cylider that clamps onto the pot and makes it easier to turn.

Got some tools a while ago on ebay with 2 sizes of the below. Fun cable to work with:smile:
 

Attachments

  • potting tool.jpg
    2.6 KB · Views: 254
Looks good to be fair.

Just two questions and not criticism!

I realise that the "Pratley" boxes are watertight, but did you not consider gelling the box?
SWA, because no pyro available?

I did, and normally would, but the job was just a patch up if I'm honest. I couldn't see the point when the whole lot will be getting ripped out in a couple of years time and replaced. They'll do fine without the gel. The customer wants additions to the circuit so will have to be done properly then. If underground JBs are to be used at this point then I would gel 'em.

SWA for two reasons; A. Because that is all that is needed, and B. I don't know anywhere that sells pyro by the meter.

:)

Edit: Third reason for the SWA, tis cheeep! :D
 
the photography skills ain't bad either. LOL. tbh, with my limited pyro skills, i'd be wary of attempting that job myself. last bit i did was 30 years ago, and that took me 2 hours to do a couple of pots.
 
Thanks Dad :D


OIT! Less of that! :D

Anyway, is this implying that I'd have done a better job if I was wrinkly? haha

Naaaaaah......I was miles younger than you when I was doing hundreds of 'em.

Wish I had some photos, never even crossed my mind....oooh lovely, some of those big boiler houses.

Unlike you, I'd have had to pay a bomb to have them developed.
 
Last week I did a job for forum member joramtor. Link to the original post here: http://www.electriciansforums.co.uk...s-your-area/87967-repair-micc-pyro-cable.html

He had an underground mineral cable that had been severed by the groundworkers so off we went to sort it out for him. The length of cable that was broken was about 50m long and ran between two lamp posts in his driveway. I thought I might put up some photos of the work along with an explanation so that those less experienced with mineral might learn something. Feel free to add to it if you want (I'm sure much flaw picking and critisism will ensue also :D).

First off the customer snipped a piece off and posted it to me so that I could determine whether it was imperial or metric and also so that I could size the pots and glands needed if it was imperial (the job was over an hour away so couldn't just pop round). Upon receiving it it was immediately apparent that it was imperial so I used my calipers to size the pots and glands needed. The pots needed were 2L2.5, the glands needed were 4L1.5 and the seals needed were 4L1. The cable in question was 4 core with the conductors being equivalent to 0.75mm-1mm.

When I arrived at the job this is what I found, it had been lying here like this, exposed, for about four months:

View attachment 23494View attachment 23495


First thing's first, isolate and lock off (circuit was already off at the breaker). Then to start... I chopped the ends away with an angle grinder for a neat and square application of the stripper (a square end always makes starting off the stripper easier) and stripped back a good three quaters of a meter of the sheath with a ring and pull. Next thing to do is to get the blowtorch out and give the cable a good blasting. Short, slow even strokes towards the cut end of the cable from about 650mm back to get rid of any moisture ingress. Remember the magnesium oxide that makes up the insulating mineral compound is hygroscopic, it wicks up moisture like nobody's business! So we have to get that out.

View attachment 23496View attachment 23497


After ten or so minutes of doing this I let the cable cool and after it was, I slid on the glands and then started stripping it back with the joistripper. This was tougher than usual as the cable was very slightly too fat to fit in the 2L2.5 hole and a bit loose in the 4L1.5 hole. I went through two blades with this bit! In hindsight I should really have used a heavy duty stripper but hey ho. When the cables were stripped back the pots were screwed on and potting compound was applied from one side only to eliminate air pockets within the pot. Notice the caps are half slid down, this helps to keep the conductors in place through the potting compound filling process. The caps were then put in place and crimped using a mineral crimping tool.

View attachment 23498View attachment 23499


When this was done it was time to IR the conductors and copper sheath. The lowest result was roughly 20Mohms live-live. Not perfect but okay. After this I belled out the ends between the break and each lamp post with my long lead to determine which core was which and also to check earth continuity on the sheath which was being used as the cpc. Once this was done the insulation was applied and the cables identified. Two cores were not used and were disconnected at the lamp posts. At the supply end I ensured that these were earthed as they previously weren't.

View attachment 23500View attachment 23501


Once this was done I terminated the gland at one of two Pratley underground junction boxes making sure to clean the copper on the exposed mineral sheath to ensure zero resistance between this and the olive within the compression gland. I then prepared a short length of 4 core 1mm SWA to bridge the gap and terminated this into the other side of the Pratley.

View attachment 23502View attachment 23503


This process was then repeated on the second Prately on the other end of mineral cable so that the short length of SWA was the bridge in the gap of the break. Once this was done it was time to seal the gland terminations. I tightly wrapped some insulation tape at the join between the glands and the cable to ease the transition and then wrapped tightly and carefully with a couple of layers of self amalgamating tape. This will seal the joins and prevent corrosion of any previously exposed metal.

View attachment 23504View attachment 23505


Once sealed up the cables were joined with wagos and the circuit tested, dead tests then live. Total lowest IR had now reduced to 15Mohms (a product of the increase in length [2x25m = 50m]), again, not perfect but okay. Pratleys have a built in method of preserving cpc continuity so no need for fly leads. All tested out ok so MCB on and a functional test of the circuit carried out. All ok. MCB off, JBs sealed up with the lids and put in place, circuit energised and away we go!

View attachment 23506View attachment 23507


The customer was told by more than one person that it couldn't be done, and here it is! Never say never! :)

Nice very nice
 
Good work, just a shame there doesn't seem to as many out there any more who can work with MIMS, MICC, Pyro or what ever else you want to call it.

Not done many ends of it myself in 20 years but I still feel confident when I need to terminate it.
 
Used to do Pyro risers a fair bit ,about 25 to 30 years ago and the odd repair on communal lighting here and there , still got all the tools, but haven't used it for a long time now , still good job nice to see these practices in use today..
 
Nice job !
I would have gone for a one ( if the strip lengths were not to long) or two resin joints personally as I just do not trust cw's that much , but as with most stuff that's just down to personal choice .

We are just in the middle of installing a mezzy floor in our unit and only last week while emptying some of the racking to make room for the legs , I found all of our Pyro gear and tried to work out when I had last used it ! I think it was about 8 years ago on some heating controls in a school plant room that we were installing ?

I do not tend to see it now days as my other director looks after the school side , but having said that we have had two rewires so far this year in the same village where we have reluctantly replaced the original Pyro , one in the village church with FP200 and the other in an old estate house with T+E .

In the estate house all of the cables entering the metal JB's had been soldered to the casing as well .
 
Well done with the presentation.I am sure it will be very informative for anyone not familiar working with the cable and how it is made off with good step by step instruction
icon14.png


One minor tip that you practised but did not mention in the description and it is shown in your photo's

You explained how to insert the compound from one side only to minimise getting air pockets, but you did not note that you used the wrapping to cover the compound when inserting it,( not getting your mitts on the compound when filling the pot)

I therefore need to admonish you on your teaching skills,you must try harder
icon6.png

icon7.png


Again a well presented subject and carried out by a fine electrical tradesman
icon14.png
 
One minor tip that you practised but did not mention in the description and it is shown in your photo's

You explained how to insert the compound from one side only to minimise getting air pockets, but you did not note that you used the wrapping to cover the compound when inserting it,( not getting your mitts on the compound when filling the pot)

I therefore need to admonish you on your teaching skills,you must try harder

Oh yes haha! Well spotted, I completely forgot to mention it! I suppose because it just comes naturally. I shall hang my head in shame :( lol
 
Thanks for the informative post, Mr Skelton. :)

Many of the subsequent posts abouve are along the lines of, "Haven't done one of these for years." What's the reason for this? Are there cheaper, easier alternatives nowadays, for many of the situations where it would have been used routinely in the past? Is MI cable still used routinely anywhere?

Thanks again. :)
 
FP200 is now been used instead as it's easier, quicker and cheaper. micc is still used, but not as much.
 
Absolutely loved doing pyro. Spent nearly 8 months of my apprenticeship in Glasgow Southern General hospital(that is now closing down) doing a surface clipped fire alarm system. Brilliant job. Surface clipped pryo is an art in itself. Use a rubber mallet instead of a hammer if needed. Had my straightening tool too just in case the coil was a bit out of kilter (did happen on occasion lol). We would have a 12" (300mm) bit of pyro in our hand to mark up the clip spacing and then it was drill drill drill ect. Then as posted above it was onto making the ends off. Test as you go...don't get smart or you WILL come a cropper. Funny enough everybody always claimed to have never had an "end down" (Fault due to bad termination)......Well I can tell you I have made thousands of ends and I definitely had a few bad ones lol.....as long as you attended to the issue diligently and rectified the issue then it was no big deal really....but as said nobody EVER admitted to a bad end lol.
Good thread....brings back some great memories of doing some big old jobs solely using this gear. The substitute today is nowhere near as "interesting" to install.
 
thanks for taking the time to post a well written/photo'd 'guide'. i was, i think, fortunate to have done (and now realise, trusted to do) pyro in a couple of churches and university owned buildings in the 90's. took great pride in getting 'sets' uniform (boss probably lost £ there!).
since coming back haven't come across it sadly.
thanks particularly ds, for the blowtorch tip - was unaware, but makes perfect sense.
perhaps there should be a designated section for 'walk through guides' like this, but i guess, not for diy'ers!!

Would be a nice idea in the arms so its away from most peoples eyes
 
just to keep the theme of old times Does anybody remember or indeed used, the crappy little modification that was brought out to try and reduce the potting procedure
It was a resin filled spacer come shroud type thing that had to be heated with a purpose made torch come oven
It never became popular or replaced the traditional method,but I would give them 1 out of ten for effort
 
Last week I did a job for forum member joramtor. Link to the original post here: http://www.electriciansforums.co.uk...s-your-area/87967-repair-micc-pyro-cable.html

He had an underground mineral cable that had been severed by the groundworkers so off we went to sort it out for him. The length of cable that was broken was about 50m long and ran between two lamp posts in his driveway. I thought I might put up some photos of the work along with an explanation so that those less experienced with mineral might learn something. Feel free to add to it if you want (I'm sure much flaw picking and critisism will ensue also :D).

First off the customer snipped a piece off and posted it to me so that I could determine whether it was imperial or metric and also so that I could size the pots and glands needed if it was imperial (the job was over an hour away so couldn't just pop round). Upon receiving it it was immediately apparent that it was imperial so I used my calipers to size the pots and glands needed. The pots needed were 2L2.5, the glands needed were 4L1.5 and the seals needed were 4L1. The cable in question was 4 core with the conductors being equivalent to 0.75mm-1mm.

When I arrived at the job this is what I found, it had been lying here like this, exposed, for about four months:

View attachment 23494View attachment 23495


First thing's first, isolate and lock off (circuit was already off at the breaker). Then to start... I chopped the ends away with an angle grinder for a neat and square application of the stripper (a square end always makes starting off the stripper easier) and stripped back a good three quaters of a meter of the sheath with a ring and pull. Next thing to do is to get the blowtorch out and give the cable a good blasting. Short, slow even strokes towards the cut end of the cable from about 650mm back to get rid of any moisture ingress. Remember the magnesium oxide that makes up the insulating mineral compound is hygroscopic, it wicks up moisture like nobody's business! So we have to get that out.

View attachment 23496View attachment 23497


After ten or so minutes of doing this I let the cable cool and after it was, I slid on the glands and then started stripping it back with the joistripper. This was tougher than usual as the cable was very slightly too fat to fit in the 2L2.5 hole and a bit loose in the 4L1.5 hole. I went through two blades with this bit! In hindsight I should really have used a heavy duty stripper but hey ho. When the cables were stripped back the pots were screwed on and potting compound was applied from one side only to eliminate air pockets within the pot. Notice the caps are half slid down, this helps to keep the conductors in place through the potting compound filling process. The caps were then put in place and crimped using a mineral crimping tool.

View attachment 23498View attachment 23499


When this was done it was time to IR the conductors and copper sheath. The lowest result was roughly 20Mohms live-live. Not perfect but okay. After this I belled out the ends between the break and each lamp post with my long lead to determine which core was which and also to check earth continuity on the sheath which was being used as the cpc. Once this was done the insulation was applied and the cables identified. Two cores were not used and were disconnected at the lamp posts. At the supply end I ensured that these were earthed as they previously weren't.

View attachment 23500View attachment 23501


Once this was done I terminated the gland at one of two Pratley underground junction boxes making sure to clean the copper on the exposed mineral sheath to ensure zero resistance between this and the olive within the compression gland. I then prepared a short length of 4 core 1mm SWA to bridge the gap and terminated this into the other side of the Pratley.

View attachment 23502View attachment 23503


This process was then repeated on the second Prately on the other end of mineral cable so that the short length of SWA was the bridge in the gap of the break. Once this was done it was time to seal the gland terminations. I tightly wrapped some insulation tape at the join between the glands and the cable to ease the transition and then wrapped tightly and carefully with a couple of layers of self amalgamating tape. This will seal the joins and prevent corrosion of any previously exposed metal.

View attachment 23504View attachment 23505


Once sealed up the cables were joined with wagos and the circuit tested, dead tests then live. Total lowest IR had now reduced to 15Mohms (a product of the increase in length [2x25m = 50m]), again, not perfect but okay. Pratleys have a built in method of preserving cpc continuity so no need for fly leads. All tested out ok so MCB on and a functional test of the circuit carried out. All ok. MCB off, JBs sealed up with the lids and put in place, circuit energised and away we go!

View attachment 23506View attachment 23507


The customer was told by more than one person that it couldn't be done, and here it is! Never say never! :)

very nice job :shades_smile:
 
Great thread but for heavens sake DS get yerself some new trousers, a split right at the crotch! In this chilly weather and all!

:willy_nilly:

Haha, they're scruffs, the good old crotch split happens at about 6 months, I've gone through two other pairs before I decided to just not care lol. They're great everywhere else bar the crotch area, seems to be their weak point.
 
I put this video on before.....but its worth looking at...a bit long winded, but shows the difference between FP200 & pyro tests in the real world
https://www.youtube.com/watch?v=N3ZAYFSwInk


I had not seen that video before,it confirmed what I always suspected,there is no comparable cable for durability and fire safety
Very informative tazz,
icon14.png

I especially liked the hammering attempt on the light circuit
 
I think it proves the point, that there is a very big difference between the two cables, in the real world....LUL have always had their own specifications on the underground, as well as the own specifications on the fire alarm system...With Advanced fire alarm systems being the only system they will now use, being manufacture especially for LUL
 
just to keep the theme of old times Does anybody remember or indeed used, the crappy little modification that was brought out to try and reduce the potting procedure
It was a resin filled spacer come shroud type thing that had to be heated with a purpose made torch come oven
It never became popular or replaced the traditional method,

Ahhh the shrink on seals they were a good idea but the Pyro heatgun / oven / blowtorch thing they produced as the tooling needed was absolutely useless

When they first came out in about 1980 one of the new build Pilkington sites in St Helens was used as a test site and all the fire alarm pyro's were terminated with them. They also had an earth tail seal that was a shrink on job. Never heard of any problems and I assume they are still in place although the site was extended some years ago

They were very good for repairing old imperial pyros quickly as they would fit a number of cable sizes, when they were discontinued the pyro rep gave the company I was with at the time all the remaining stock from BICC in Prescot ( a briefcase full ) and they were slowly used up over a few years

but I would give them 1 out of ten for effort

I think a pyro terminated with a shrink seal is still a lot better than an FP cable, they could have done something better as in the early days they had a few issues with the blowtorches due to being cheap and nasty (loads were returned to BICC) and getting people to accept change (nothing new there) they were never going to be a big seller with people so used to the quality a pot termination gives. I liked them for certain things and used both pots and the shrink seals while they were available


D. Skelton good to see someone repairing a pyro rather than rip it out and a good write up too a bit of a trip down memory lane for me
 
If you get the job to do the upgrade, it would be interesting to find out what the IR is then. If the old seals on the other ends are tight that residual moisture might have dispersed far enough to give a nice high reading.

I always used to doubt that bit at first, where they said that even quite a low reading will come good over time as the moisture spreads out rather than being all in a ring around the end. But you only have to heat an old sheathed heating element to see how true this is. Could be megs when cold but while it's warming up the insulation drops to tens of K as all the moisture from along the length condenses around the cold ends.

Nice explanatory post there, hope it will persuade people to brush up on their MI skills.
 
Last week I did a job for forum member joramtor. Link to the original post here: Electrical Blog - Electrical Advice | Free Electricians Advice Forum - http://www.electriciansforums.co.uk/electricians-unite-jobs-your-area/87967-repair-micc-pyro-cable.html

He had an underground mineral cable that had been severed by the groundworkers so off we went to sort it out for him. The length of cable that was broken was about 50m long and ran between two lamp posts in his driveway. I thought I might put up some photos of the work along with an explanation so that those less experienced with mineral might learn something. Feel free to add to it if you want (I'm sure much flaw picking and critisism will ensue also :D).

First off the customer snipped a piece off and posted it to me so that I could determine whether it was imperial or metric and also so that I could size the pots and glands needed if it was imperial (the job was over an hour away so couldn't just pop round). Upon receiving it it was immediately apparent that it was imperial so I used my calipers to size the pots and glands needed. The pots needed were 2L2.5, the glands needed were 4L1.5 and the seals needed were 4L1. The cable in question was 4 core with the conductors being equivalent to 0.75mm-1mm.

When I arrived at the job this is what I found, it had been lying here like this, exposed, for about four months:

View attachment 23494View attachment 23495


First thing's first, isolate and lock off (circuit was already off at the breaker). Then to start... I chopped the ends away with an angle grinder for a neat and square application of the stripper (a square end always makes starting off the stripper easier) and stripped back a good three quaters of a meter of the sheath with a ring and pull. Next thing to do is to get the blowtorch out and give the cable a good blasting. Short, slow even strokes towards the cut end of the cable from about 650mm back to get rid of any moisture ingress. Remember the magnesium oxide that makes up the insulating mineral compound is hygroscopic, it wicks up moisture like nobody's business! So we have to get that out.

View attachment 23496View attachment 23497


After ten or so minutes of doing this I let the cable cool and after it was, I slid on the glands and then started stripping it back with the joistripper. This was tougher than usual as the cable was very slightly too fat to fit in the 2L2.5 hole and a bit loose in the 4L1.5 hole. I went through two blades with this bit! In hindsight I should really have used a heavy duty stripper but hey ho. When the cables were stripped back the pots were screwed on and potting compound was applied from one side only to eliminate air pockets within the pot. Notice the caps are half slid down, this helps to keep the conductors in place through the potting compound filling process. The caps were then put in place and crimped using a mineral crimping tool.

View attachment 23498View attachment 23499


When this was done it was time to IR the conductors and copper sheath. The lowest result was roughly 20Mohms live-live. Not perfect but okay. After this I belled out the ends between the break and each lamp post with my long lead to determine which core was which and also to check earth continuity on the sheath which was being used as the cpc. Once this was done the insulation was applied and the cables identified. Two cores were not used and were disconnected at the lamp posts. At the supply end I ensured that these were earthed as they previously weren't.

View attachment 23500View attachment 23501


Once this was done I terminated the gland at one of two Pratley underground junction boxes making sure to clean the copper on the exposed mineral sheath to ensure zero resistance between this and the olive within the compression gland. I then prepared a short length of 4 core 1mm SWA to bridge the gap and terminated this into the other side of the Pratley.

View attachment 23502View attachment 23503


This process was then repeated on the second Prately on the other end of mineral cable so that the short length of SWA was the bridge in the gap of the break. Once this was done it was time to seal the gland terminations. I tightly wrapped some insulation tape at the join between the glands and the cable to ease the transition and then wrapped tightly and carefully with a couple of layers of self amalgamating tape. This will seal the joins and prevent corrosion of any previously exposed metal.

View attachment 23504View attachment 23505


Once sealed up the cables were joined with wagos and the circuit tested, dead tests then live. Total lowest IR had now reduced to 15Mohms (a product of the increase in length [2x25m = 50m]), again, not perfect but okay. Pratleys have a built in method of preserving cpc continuity so no need for fly leads. All tested out ok so MCB on and a functional test of the circuit carried out. All ok. MCB off, JBs sealed up with the lids and put in place, circuit energised and away we go!

View attachment 23506View attachment 23507


The customer was told by more than one person that it couldn't be done, and here it is! Never say never! :)

Hi are you still working with imperial micc. I have electricians saying to me just because of one strand of the micc cable has been cut that I need a new rearing job done. They say parts not available to reterminate imperial mic. This is for connection to light switch. You defo look like you know what you are doing. Where are you and can we chat please. Ime in Hertfordshire by the way. Thanks Andy.
 

Reply to Repairing imperial mineral cable in the UK Electrical Forum area at ElectriciansForums.net

Similar Threads

Some advise or views would be appreciated. My supply is 100 amp single phase. I purchased my property 3 years ago or so, the owner prior to the...
Replies
29
Views
1K
Background: I am not an electrician, I am a retired professional engineer high power broadcast transmitter design , but am dabbling outside my...
Replies
15
Views
2K
I had an interesting little job this morning. Three sockets in an extension were not working and haven't worked for quite some time (years). It...
Replies
0
Views
313
Hi, while carrying out an EICR at a farm cottage on Friday i came up against a problem early on. Whilst measuring the Ze the reading i obtained...
Replies
22
Views
2K
Hi, I have a Victron Multiplus-II 5kVA inverter/charger with Pylontech US5000 batteries installed in my house along with a 6.8kWp PV array and...
Replies
12
Views
530

OFFICIAL SPONSORS

Electrical Goods - Electrical Tools - Brand Names Electrician Courses Green Electrical Goods PCB Way Electrical Goods - Electrical Tools - Brand Names Pushfit Wire Connectors Electric Underfloor Heating Electrician Courses
These Official Forum Sponsors May Provide Discounts to Regular Forum Members - If you would like to sponsor us then CLICK HERE and post a thread with who you are, and we'll send you some stats etc

YOUR Unread Posts

This website was designed, optimised and is hosted by untold.media Operating under the name Untold Media since 2001.
Back
Top
AdBlock Detected

We get it, advertisements are annoying!

Sure, ad-blocking software does a great job at blocking ads, but it also blocks useful features of our website. For the best site experience please disable your AdBlocker.

I've Disabled AdBlock